Connman: How to enable Debug Messaging

To enable message logging in connman the code needs to be called with the argument -d. If you are building the code under yocto you can either modify the connman.service.in file in the src directory to include the following lines. This will cause the appropriate changes to be written to the rootfs everytime it’s built.

EnvironmentFile=/home/root/connman.env
ExecStart=@sbindir@/connmand -n $DEBUG

Alternatively the changes could be made directly to the systemd configuration file connman.service.

The lines above make use of an environment variable $DEBUG which is being set in the file /home/root/connman.env, which contains the following lines.

DEBUG=-d
CONNMAN_SUPPLICANT_DEBUG=1

The -d argument is used to turn on debugging. By adding additional parameters to this line it is also possible to specify which files we want to get debug messages from.

The CONNMAN_SUPPLICANT_DEBUG variable is included because some messaging in connman is enabled according to environment variable settings. The wifi.c file for example includes the following function.

static void debug(const char *str)
{
  if (getenv("CONNMAN_SUPPLICANT_DEBUG"))
    connman_debug("%s", str);
}

Out of RAM: Increase a meagre swapfile under Linux

Swap space is an area set aside for use in the event that physical RAM becomes full. On a Linux machine, when the system runs out of RAM inactive pages are moved to the Swap Space freeing up RAM.

Whilst building a Yocto Image on an old machine with limited RAM I was getting repeated failures during the compilation of qtbase. Analysis of the kernel log revealed that there was a shortage of memory, and hence a need to increase the swap space.

You can determine the current status of the swap space using the following command

$ sudo swapon --show
NAME      TYPE SIZE   USED PRIO
/swapfile file   2G 265.9M   -2

To increase the size of the swapfile, begin by disabling the swap space, and then remove the existing swapfile.

sudo swapoff /swapfile
sudo rm /swapfile

You can now create a new blank swapfile, set the permissions associated with it, and then re-enable the swap space.

sudo dd if=/dev/zero of=/swapfile bs=1M count=8192
sudo chmod 600 /swapfile
sudo mkswap /swapfile
sudo swapon /swapfile

ssh: How to Escape a Dead or Unresponsive Session

You can end a stuck ssh session by typing ~. at the beginning of a line. This means that if you have already been typing something you may have to hit the enter key before typing the ~ (tilde) and . (dot) characters.

The tilde character is an escape character in ssh. If you were to enter ~? at the beginning of a line you will get a list of supported escape sequences like the one seen below.

$ ~?
Supported escape sequences:
~. - terminate connection (and any multiplexed sessions)
~B - send a BREAK to the remote system
~C - open a command line
~R - request rekey
~V/v - decrease/increase verbosity (LogLevel)
~^Z - suspend ssh
~# - list forwarded connections
~& - background ssh (when waiting for connections to terminate)
~? - this message
~~ - send the escape character by typing it twice
(Note that escapes are only recognized immediately after newline.)

One useful item in the list is the suspend ssh sequence. If you enter ~ (tilde) followed by ^z ( ctrl and z) you will be returned to the command prompt on your local machine. You can then execute commands locally before returning to the ssh session using the fg command.

Yocto: How to assign variables with examples

  • = A hard assignment. The variable is assigned as soon as the statement is evaluated. If the assignment contains a reference to another variable then that reference will be included in the assignment rather that the value of the reference.
  • ?= Defines a variable only if it is undefined at the time of parsing.
  • ??= Assignment does not occur until the end of the parsing process.
  • := Immediate variable expansion
  • += Appending with spaces.
  • =+ Prepending with spaces.
  • .= Appending without spaces.
  • =. Prepending without spaces.

Assignment Using Overrides

Variables can be appended or prepended using the override style syntax. In the example below B becomes equal to “bval additional data” and C becomes equal to “additional data cval”. Note that no additional spaces are include over what is in the original variable definitions.

B = "bval"
B_append = " additional data"
C = "cval"
C_prepend = "additional data "

Removal of data can also be accomplished. In the following example FOO becomes equal to “ghi abcdef”. Note that surrounding spaces are also removed.

FOO = "abc def ghi abcdef abc def abc def"
FOO_remove = "abc def"

Examples

In the following example the value of A is set to “aval”. The value of B is set to “pre${A}post”. In other words the value of B becomes dependent on the value of A at the times it is referenced. If the value of A changes between references to B the value of B will be different at those times.

A = "aval"
B = "pre${A}post"

The following code includes some immediate variable assignment. The value of A becomes “test 123” as the values of A and B are unassigned at the time of As assignment.

T = "123"
A := "${B} ${A} test ${T}"

The following code uses a soft assignment. A is only assigned if the value is currently unassigned. The code therefore results in A being given the value of “one”

A ?= "one"
A ?= "two"

The following code uses weak assignment. A is not assigned until the end of the parsing process and is therefore given a value of “two”

A ??= "one"
A ??= "two"

Yocto: base_contains

The base_contains function is used to return a value based on a search of a named variable for a given value. The following line of code for example would search the DISTRO_FEATURES variable for the text bluetooth and if found it would return the text bluez5 otherwise we would get a blank.

"${@base_contains('DISTRO_FEATURES', 'bluetooth', 'bluez5', '', d)}"

Linux Commands: Alias

An alias is a shortcut to entering a command in Linux. You can create an alias as shown below.

$ alias ll='ls -l'

If you now enter the command ll, you will get the same output you would have got if you had entered the command ls -l. If you want to add further arguments or flags that is still possible. The command ll -a will for example produce the same output as typing ls -l -a.

To get a list of the current aliases you can enter the command

$ alias

at the command prompt.

Yocto: Setting the root password

To set the root password under a Yocto build you need to add the following code to the local.conf file located in the build/conf directory.

INHERIT += "extrausers"
EXTRA_USERS_PARAMS = "usermod -p Rbna8drt0yYLk root;"

Where the Rbna8drt0yYLk value is generated via the command

$ openssl passwd <password>

MySQL: How to Reset the AUTO_INCREMENT Value

If you are using the auto_increment feature of MySQL and table edits have lead to the value generated being in advance of requirements or just generally adrift you can use the following command to adjust the next auto_increment output value.

ALTER TABLE <table name> AUTO_INCREMENT = <value>

Bear in mind however that it is not possible to put the auto_increment value back to a value less than the current maximum value in the auto_incrementing column so you may need to do some tidying first. You can find the current maximum value using the following command:

SELECT MAX( <auto incrementing column> ) FROM <table name> ;

You can confirm that the change has taken using the following command:

SHOW TABLE STATUS FROM <DB name> WHERE name LIKE '<table name>' ;

How to connect and control an I2C device under Linux

An I2C bus can be searched to identity which addresses are in use using the i2cdetect command as shown below.

$ i2cdetect 1
WARNING! This program can confuse your I2C bus, cause data loss and worse!
I will probe file /dev/i2c-1.
I will probe address range 0x03-0x77.
Continue? [Y/n] Y
     0  1  2  3  4  5  6  7  8  9  a  b  c  d  e  f
00:          -- -- -- -- -- UU -- -- -- -- -- -- --
10: -- -- -- -- -- -- -- -- -- -- -- -- -- -- -- --
20: -- -- -- -- -- -- -- -- -- -- -- -- -- 2d -- --
30: -- -- -- -- -- -- -- -- -- -- -- -- -- -- -- --
40: -- -- -- -- -- -- -- -- -- 49 -- -- -- -- -- --
50: -- -- -- -- -- -- -- -- -- -- -- -- -- -- -- --

The output in the above example indicates that there are three devices on bus 1. Devices were identified at addresses 2d and 49. The ‘–‘ symbol indicates that these address were probed but that no device responded, whilst the ‘UU’ at address 08 indicates that this address was not probed as it was being held by another driver.

Having identified that a device is present you can interact with the device using the i2ctranfser command. In the first example given below a value is 0x80 is written to address 0x503d on the device located at I2C address 0x3c. The second example reads two bytes of data from address 0x300a on the same device. In this case the device responds with the values 0x36 and 0x4c, the correct product ID for the queried OV3640 camera device.

$ i2ctransfer -f -y 1 w3@0x3c 0x50 0x3d 0x80
$ i2ctransfer -f -y 1 w2@0x3c 0x30 0x0a r2
0x36 0x4c

Alternatively, if a suitable driver exists within the kernel then you can connect it as shown below and interact with it using sysfs. In the example given I have connected a ds1621 digital thermometer located at I2C address 0x3c and read the temperature of 29.5 C

$ echo ds1621 0x3c > /sys/bus/i2c/devices/i2c-1/new_device
$ cat /sys/class/hwmon/hwmon1/temp1_input
29500

How to Connect To A Raspberry Pi Using X11 And Cygwin

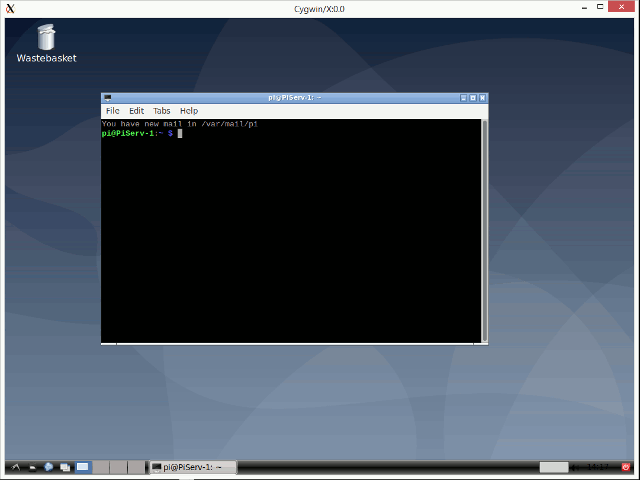
X11 view of a Raspberry Pi using Cygwin
X11 Connection to a Raspberry Pi using Cygwin

Open up a cygwin shell and enter the following command at the prompt

$ cygstart xwin

Cygstart tells cygwin to run a command and return control to the shell, thus removing the need for two shells, one to launch the xwin application and the other to handle the ssh connection.

With the xwindow running we need to make cygwin aware of the remote display by exporting the environment variable DISPLAY with the appropriate parameters, taken from the title of the newly opened window: it will likely look something like this Cygwin/X:0.0. Enter the following command as appropriate

$ export DISPLAY=:0.0

Now start the SSH connection to the raspberry pi using cygwin with the following command and your own username and ip address

$ ssh -Y user@address

After the logon to the pi is completed start the xwindow session using the following command

$ lxsession

You should now have an x window connection to the pi along the lines of that shown above.