Cpplint is an open source tool used to check source code against the Google C++ Style Guide. The code is run from the command line as shown below, and results in output similar to that shown
$ cpplint file1.cpp
file.cpp:1: Include the directory when naming .h files [build/include_subdir] [4]
file.cpp:2: Include the directory when naming .h files [build/include_subdir] [4]
file.cpp:88: Use int16/int64/etc, rather than the C type long [runtime/int] [4]
file.cpp:89: Use int16/int64/etc, rather than the C type long [runtime/int] [4]
The style guide suggests that all header files should be listed relative to the projects source directory without use of unix aliases such as . (current directory) or .. (parent directory). As such, the format for an include of a file located at project/src/base/file.h would look like
#include "base/file.h"
Where integer types are concerned the guide suggests that the only built-in integer type that should be used is int, and that all other required types should be taken from <stdint.h> implying that short should be replaced with int16_t and long long with int64_t. The standard also suggests that the use of unsigned types should be avoided unless they are specifically required.
Supposing that you don’t want to modify your code to remove these warning messages. One solution is to call cpplint using filters as shown below:
Structured Exception Handling (SEH) is a Microsoft extension to C designed to handle faults gracefully, with the intention that memory and files can be released correctly when execution is unexpectedly terminated.
There are two types of SEH mechanisms:
Exception Handlers, or __except blocks, which can respond or dismiss an exception
Termination Handlers, or __finally blocks, which are always called whether an exception causes termination or not.
When an exception occurs the stack is unwound and the OS looks for the most recent exception handler. As each layer of the stack is unwound the OS calls any termination handlers which have been written for each function, in the process cleaning up any resources which would have otherwise been left open. This might include closing critical sections, releasing mutexes, or freeing memory.
At each stage of the unwinding process the OS checks the latest functions PDATA structure to find out in an exception handler exists.
Offset
Bits
Field
Description
0
31-0
Begin Address
Virtual address of the corresponding function
4
7-0
Prolog Length
Number of instructions in the function's prolog
4
29-8
Function Length
Number of instructions in the function
4
30
32-bit Flag
Set if the function uses 32-bit instructions, clear for 16-bit instructions
4
31
Exception Flag
Set if an exception handler exists for the function
If an exception handler is flagged to exist or the function length is zero then an additional PDATA_EH structure will precede the function in the .text section. This structure will contain pointers to the exception handler and the handler’s data record.
Recently I have been getting emacs sessions locking up on my ubuntu machine. With several emacs sessions open, and no way out other than killing the specific session, you need to find the correct PID. But which session is which?
You can get additional info regarding processes using ps. The example below gives information relating to my currently running emacs sessions.
The numbers at the head of the last four lines correspond to the PID for each emacs session. If you need to know the process owner call ps with the argument ‘aux’.
a - show processes for all users
u - display the process owner
x - show processes not attached to a terminal
The status flags can be interpreted as follows:
D - uninterruptible sleep (usually IO)
R - running or runnable (on run queue)
S - interruptible sleep (waiting for an event to complete)
T - stopped by job control signal
t - stopped by debugger during the tracing
W - paging (not valid since the 2.6.xx kernel)
X - dead (should never be seen)
Z - defunct ("zombie") process, terminated but not reaped by its parent
In my case the stalled session was newly opened, so the time was an indication, as was the command line used to start the session. Also, the session was not started from the command line, so without the ‘x’ argument the session did not appear.
You can enter a Unicode Character in emacs with the following sequence:
C-x 8 <enter> <character code> <enter>
If Unicode is supported on your installation you should see an ‘Insert character’ message after pressing enter for the first time. If it is not supported then you will get a message along the lines of ‘C-x 8 not defined’.
To get a small e with an accute accent you would use the character code ‘e9’, so the full sequence would be
C-x 8 <enter> e9 <enter>
You can find lists of character codes at the following sites:
Simple processors used to have two modes. The first would handle the everyday processing tasks, whilst the second would kick in when an interrupt occurred. The interrupt would result in the processor saving its current state and then jumping to some predefined location to service the interrupt. Modern processors are required to do much more complicated things, servicing many tasks/programs at the same time. Keeping these tasks separate from each other and from the OS requires additional levels of privilege and hence a need for additional modes.
User Mode
This is the default, unprivileged mode under which most processes run.
System Mode
System Mode provides a means for the exception handler to execute subroutines without the potential for further exceptions over-writing the return address stored in R14.
Fast Interrupt Mode (FIQ)
Fast Interrupt Requests are essentially higher priority interrupts which operate in a dedicated mode. FIQ mode has seven dedicated registers (R8-R14) allowing a degree os persistence between interrupts. Under Linux, which only uses IRQs, the use of this system allows the software to implement a degree of real-time code. Writing the code does however require the use of assembler because of the register restrictions.
Normal Interrupt Mode (IRQ)
IRQ mode is entered when a regular, low priority interrupt is raised. As with all exceptions, when an IRQ occurs the processor copies the CPSR register to the mode appropriate SPSR and assigns the return address to the mode appropriate return address. The CPSR mode bits are modified as according to the new mode and the program counter is set according to an address taken from the exception vector table
Abort Mode
Abort mode is entered after a data or instruction prefetch is aborted. This occurs as a result of an application attempting to access an illegal memory location. It is usually possible to calculate the address of the instruction that caused the exception by looking at the value of the link register (R14) and subtraction 8.
Supervisor Mode (SVC)
When code executing in user mode requires access to privileged parts of the system this is typically achieved by an SVC call and a switch to Supervisor Mode.
Undefined Mode
If an unrecognised instruction is encountered the processor vectors off into undefined mode so that software emulation of co-processors or other extensions to the instruction set can be carried out.
Monitor Mode (MON)
Monitor Mode is there to facilitate the debugging of an application without stopping the core entirely. The continued servicing of critical interrupt routines can therefore continue whilst the core is being probed by the debugger.
Hypervisor Mode
Hypervisor Mode is there to facilitate virtualization. In the same way that user-space uses the SVC instruction to switch into kernel-space (SVC mode), the processor needs to be switched into Hypervisor mode in order to make use of the virtualization extensions.
There are several methods you could use to generate a file filed with random data under Linux. In the example below dd has been used to generate 1,000,000 bytes of random data.
dd if=/dev/urandom of=./randI.hex bs=1MB count=1
If you want a file filed with zeros you could substitute /dev/urandom with /dev/zero.
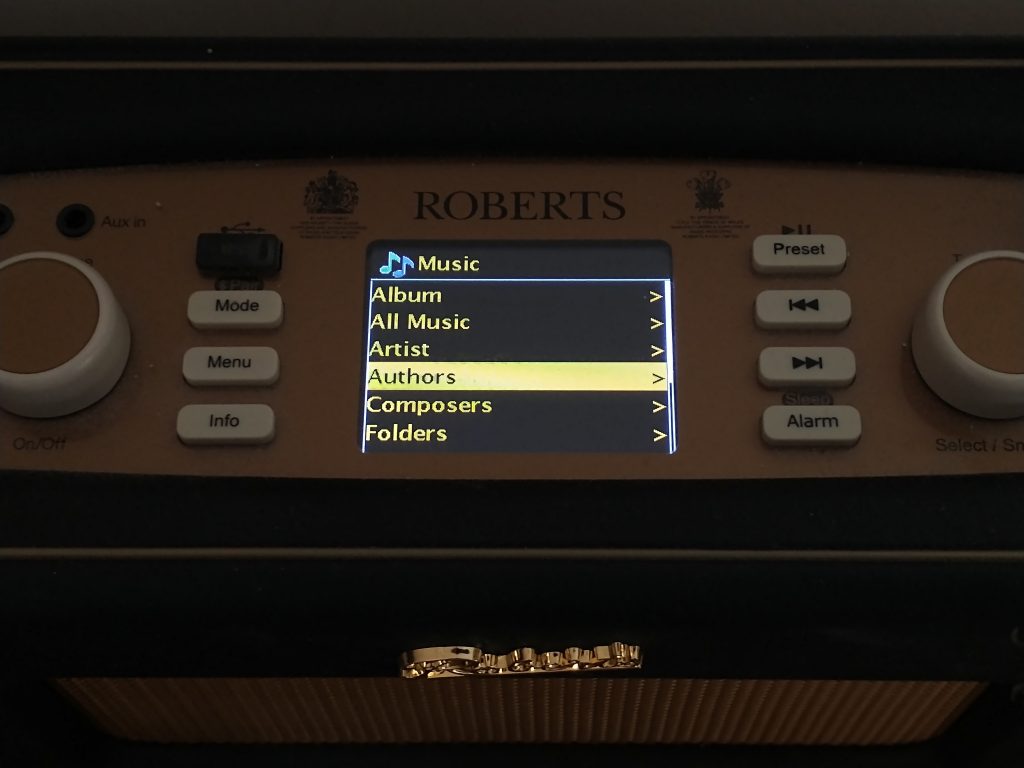
MiniDLNA is a piece of server software implementing the DLNA/UPnP protocols. The software serves media files (music, pictures and video) to clients on a network. THe software discussed here has been used along a number of Roberts Istream Radios, as well as the VLC app running on android phones, Ipad tablets and PC
David Copperfield playing on a Roberts Istream radio via minidlna running on a raspberry pi
There are several sources for the code on the internet. Alternatively you could use the sources given below. These have been modified to include support for composer and author tags. The code as compiled here has been in use for many months. We can however take no responsibility for any problems you may have as a result of it.
Music lisings available on a Roberts Istream radio via minidlna running on a raspberry pi
To begin with you may need to install some additional packages as shown below. So long as these dependencies are met the following should be sufficient for building the sources on fedora30, ubuntu 18.04 and the Raspberry Pi. I used the following sequence on ubuntu and the Pi, and the one below that on fedora30.
Extract the sources using tar and switch to the directory. You should now be in a position to compile the code using the following sequence of commands.
$ tar -xjf minidlna.tar.bz2
$ cd minidlna
$ ./autogen.sh
$ ./configure
$ make
To install and then check the installation you can enter the following commands
$ sudo make install
$ sudo checkinstall
Once you have built the application you will need to point MiniDLNA at your files by altering the contents of the minidlna.conf file, and the fire the whole thing up with a command similar to the one given below
To get the full benefit of the code you may need to set the tags associated with your mp3 files. The following screenshot shows how an audiobook has been configured for use here.
Audiobook mp3 tags for use with minidlna
For instructions on how to start minidlna automatically when the system is powered have a look at Minidlna: How to Auto Start.