Cpplint is an open source tool used to check source code against the Google C++ Style Guide. The code is run from the command line as shown below, and results in output similar to that shown
$ cpplint file1.cpp
file.cpp:1: Include the directory when naming .h files [build/include_subdir] [4]
file.cpp:2: Include the directory when naming .h files [build/include_subdir] [4]
file.cpp:88: Use int16/int64/etc, rather than the C type long [runtime/int] [4]
file.cpp:89: Use int16/int64/etc, rather than the C type long [runtime/int] [4]
The style guide suggests that all header files should be listed relative to the projects source directory without use of unix aliases such as . (current directory) or .. (parent directory). As such, the format for an include of a file located at project/src/base/file.h would look like
#include "base/file.h"
Where integer types are concerned the guide suggests that the only built-in integer type that should be used is int, and that all other required types should be taken from <stdint.h> implying that short should be replaced with int16_t and long long with int64_t. The standard also suggests that the use of unsigned types should be avoided unless they are specifically required.
Supposing that you don’t want to modify your code to remove these warning messages. One solution is to call cpplint using filters as shown below:
Recently I have been getting emacs sessions locking up on my ubuntu machine. With several emacs sessions open, and no way out other than killing the specific session, you need to find the correct PID. But which session is which?
You can get additional info regarding processes using ps. The example below gives information relating to my currently running emacs sessions.
The numbers at the head of the last four lines correspond to the PID for each emacs session. If you need to know the process owner call ps with the argument ‘aux’.
a - show processes for all users
u - display the process owner
x - show processes not attached to a terminal
The status flags can be interpreted as follows:
D - uninterruptible sleep (usually IO)
R - running or runnable (on run queue)
S - interruptible sleep (waiting for an event to complete)
T - stopped by job control signal
t - stopped by debugger during the tracing
W - paging (not valid since the 2.6.xx kernel)
X - dead (should never be seen)
Z - defunct ("zombie") process, terminated but not reaped by its parent
In my case the stalled session was newly opened, so the time was an indication, as was the command line used to start the session. Also, the session was not started from the command line, so without the ‘x’ argument the session did not appear.
There are several methods you could use to generate a file filed with random data under Linux. In the example below dd has been used to generate 1,000,000 bytes of random data.
dd if=/dev/urandom of=./randI.hex bs=1MB count=1
If you want a file filed with zeros you could substitute /dev/urandom with /dev/zero.
MiniDLNA is a piece of server software implementing the DLNA/UPnP protocols. The software serves media files (music, pictures and video) to clients on a network. THe software discussed here has been used along a number of Roberts Istream Radios, as well as the VLC app running on android phones, Ipad tablets and PC
David Copperfield playing on a Roberts Istream radio via minidlna running on a raspberry pi
There are several sources for the code on the internet. Alternatively you could use the sources given below. These have been modified to include support for composer and author tags. The code as compiled here has been in use for many months. We can however take no responsibility for any problems you may have as a result of it.
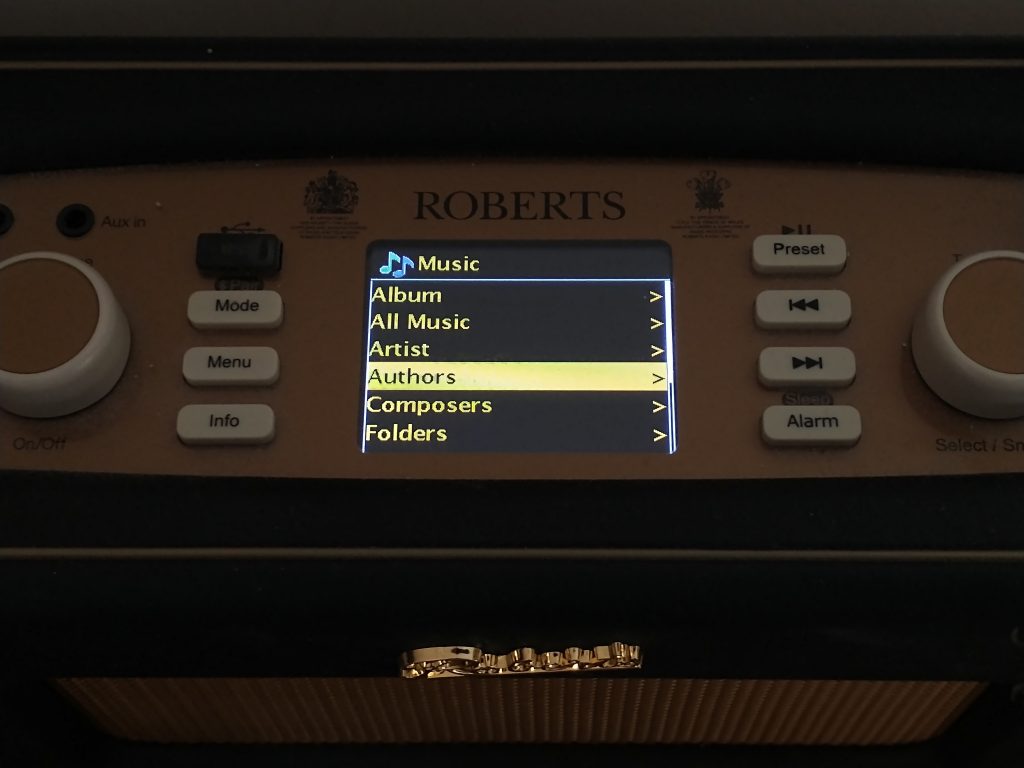
Music lisings available on a Roberts Istream radio via minidlna running on a raspberry pi
To begin with you may need to install some additional packages as shown below. So long as these dependencies are met the following should be sufficient for building the sources on fedora30, ubuntu 18.04 and the Raspberry Pi. I used the following sequence on ubuntu and the Pi, and the one below that on fedora30.
Extract the sources using tar and switch to the directory. You should now be in a position to compile the code using the following sequence of commands.
$ tar -xjf minidlna.tar.bz2
$ cd minidlna
$ ./autogen.sh
$ ./configure
$ make
To install and then check the installation you can enter the following commands
$ sudo make install
$ sudo checkinstall
Once you have built the application you will need to point MiniDLNA at your files by altering the contents of the minidlna.conf file, and the fire the whole thing up with a command similar to the one given below
To get the full benefit of the code you may need to set the tags associated with your mp3 files. The following screenshot shows how an audiobook has been configured for use here.
Audiobook mp3 tags for use with minidlna
For instructions on how to start minidlna automatically when the system is powered have a look at Minidlna: How to Auto Start.
To enable message logging in connman the code needs to be called with the argument -d. If you are building the code under yocto you can either modify the connman.service.in file in the src directory to include the following lines. This will cause the appropriate changes to be written to the rootfs everytime it’s built.
Alternatively the changes could be made directly to the systemd configuration file connman.service.
The lines above make use of an environment variable $DEBUG which is being set in the file /home/root/connman.env, which contains the following lines.
DEBUG=-d
CONNMAN_SUPPLICANT_DEBUG=1
The -d argument is used to turn on debugging. By adding additional parameters to this line it is also possible to specify which files we want to get debug messages from.
The CONNMAN_SUPPLICANT_DEBUG variable is included because some messaging in connman is enabled according to environment variable settings. The wifi.c file for example includes the following function.
Swap space is an area set aside for use in the event that physical RAM becomes full. On a Linux machine, when the system runs out of RAM inactive pages are moved to the Swap Space freeing up RAM.
Whilst building a Yocto Image on an old machine with limited RAM I was getting repeated failures during the compilation of qtbase. Analysis of the kernel log revealed that there was a shortage of memory, and hence a need to increase the swap space.
You can determine the current status of the swap space using the following command
$ sudo swapon --show
NAME      TYPE SIZE   USED PRIO
/swapfile file   2G 265.9M   -2
To increase the size of the swapfile, begin by disabling the swap space, and then remove the existing swapfile.
sudo swapoff /swapfile
sudo rm /swapfile
You can now create a new blank swapfile, set the permissions associated with it, and then re-enable the swap space.
You can end a stuck ssh session by typing ~. at the beginning of a line. This means that if you have already been typing something you may have to hit the enter key before typing the ~ (tilde) and . (dot) characters.
The tilde character is an escape character in ssh. If you were to enter ~? at the beginning of a line you will get a list of supported escape sequences like the one seen below.
$ ~?
Supported escape sequences:
~. - terminate connection (and any multiplexed sessions)
~B - send a BREAK to the remote system
~C - open a command line
~R - request rekey
~V/v - decrease/increase verbosity (LogLevel)
~^Z - suspend ssh
~# - list forwarded connections
~& - background ssh (when waiting for connections to terminate)
~? - this message
~~ - send the escape character by typing it twice
(Note that escapes are only recognized immediately after newline.)
One useful item in the list is the suspend ssh sequence. If you enter ~ (tilde) followed by ^z ( ctrl and z) you will be returned to the command prompt on your local machine. You can then execute commands locally before returning to the ssh session using the fg command.
An alias is a shortcut to entering a command in Linux. You can create an alias as shown below.
$ alias ll='ls -l'
If you now enter the command ll, you will get the same output you would have got if you had entered the command ls -l. If you want to add further arguments or flags that is still possible. The command ll -a will for example produce the same output as typing ls -l -a.
To get a list of the current aliases you can enter the command